Spring Boot + Angular 8 CRUD Example
On this page, we are going to integrate Spring Boot RESTful service with Angular 8 to perform create, read, update, and delete (CRUD) operation step by step. Angular is one of the most popular open-source web application frameworks and Spring Boot makes it easy to create stand-alone, production-ready applications that you can “just run”.
What you’ll build
In this demo, you will create Spring Boot RESTful API (backend) and Angular 8 user interface (frontend) from scratch to perform the below operations:
- Add student
- View the list of students
- Edit the student
- Delete the student
To make it more easy to understand, we have divided this tutorial into two parts:
- Backend → creates the REST endpoint with Spring Boot and accesses the database using Spring Data JPA.
- Frontend → creates the user interface services (web pages) using Angular 8.
Prerequisite
We have used the following technologies while creating this Spring Boot + Angular 8 CRUD application.
- Backend
- Spring Boot 2.1.9.RELEASE
- Java 8
- Spring Data JPA
- MySQL Database
- Frontend
- Nodejs v10.16.2
- npm 6.9.0
- Angular CLI 8.3.3
- Backend
Let’s begin the actual piece of coding…
1. Backend- API Development
We will create a Spring Boot application that exposes the GET, ADD, EDIT, DELETE API so that the client-side can consume it.
1.1 Dependency Required
Add the following dependencies to your pom.xml file.
<dependencies>
<dependency>
<groupId>org.springframework.boot</groupId>
<artifactId>spring-boot-starter-data-jpa</artifactId>
</dependency>
<dependency>
<groupId>org.springframework.boot</groupId>
<artifactId>spring-boot-starter-web</artifactId>
</dependency>
<dependency>
<groupId>mysql</groupId>
<artifactId>mysql-connector-java</artifactId>
<scope>runtime</scope>
</dependency>
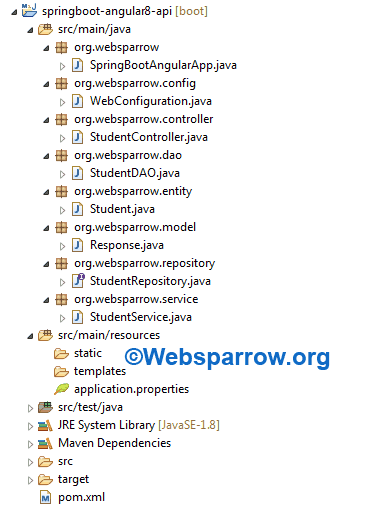
</dependencies>1.2 Project Structure
The final project structure of our application in STS 4 IDE will look like as follows:
1.3 Create Database
Open your MySQL database and create a fresh database by the following command.
#create database <database-name-of-your-choice>;
CREATE DATABASE spring_angular;
You can also use your previously created database.
Don’t worry about creating tables, Spring Data JPA will manage it.
1.4 application.properties
Set your database connection strings, server port, context path, etc in the application.properties file.
# Set application port and context path
server.servlet.context-path=/api
server.port=8080

# MySQL database connection strings
spring.datasource.username=root
spring.datasource.password=root
spring.datasource.url=jdbc:mysql://localhost:3306/spring_angular

# JPA property settings
spring.jpa.hibernate.ddl-auto=update
spring.jpa.properties.hibernate.show_sql=true
1.5 Entity
Create a Student class that holds all the attributes of a student.
package org.websparrow.entity;

@Entity
@Table(name = "student")
public class Student implements Serializable {

	private static final long serialVersionUID = 1681261145191719508L;
	@Id
	@GeneratedValue(strategy = GenerationType.IDENTITY)
	private int id;
	private String firstName;
	private String lastName;
	private String email;

	// Generate Getters and Setters...
}
1.6 Repository
The StudentRepository interface will extend the JpaRepository interface that exposes CRUD methods.
package org.websparrow.repository;

@Repository
public interface StudentRepository extends JpaRepository<Student, Integer> {

}
1.7 Date Access Layer (DAO)
StudentDAO class will autowired the StudentRepository interface to perform the operation at the database level.
package org.websparrow.dao;

@Repository
public class StudentDAO {

	@Autowired
	private StudentRepository studentRepository;

	public List<Student> get() {
		return studentRepository.findAll();
	}

	public Student save(Student student) {
		return studentRepository.save(student);
	}

	public void delete(int id) {
		studentRepository.deleteById(id);
	}
}
1.8 Service
The service layer implements the business logic and calling a method from a DAO object.
package org.websparrow.service;

@Service
public class StudentService {

	@Autowired
	private StudentDAO studentDAO;

	public List<Student> get() {
		return studentDAO.get();
	}

	public Student save(Student student) {
		return studentDAO.save(student);
	}

	public void delete(int id) {
		studentDAO.delete(id);
	}
}
1.9 Model
Response model class is responsible for displaying the API response in an organized format.
package org.websparrow.model;

public class Response {

	// Generate Getters and Setters...
	private Object data;
	private Date date;

	public Response(Object data, Date date) {
		super();
		this.data = data;
		this.date = date;
	}
}
1.10 Controller
Create StudentController class which will expose endpoints for the following:
1. /api/student :GET retrieve list of student
2. /api/student :POST add a new student
3. /api/student :PUT updates existing student
4. /api/student :DELETE deletes the student
package org.websparrow.controller;

@RestController(value = "/student")
public class StudentController {

	@Autowired
	private StudentService studentService;

	@GetMapping
	public ResponseEntity<Response> get() {
		return ResponseEntity.status(HttpStatus.OK)
				.body(new Response(studentService.get(), new Date()));
	}

	@PostMapping
	public ResponseEntity<Response> save(@RequestBody Student student) {
		return ResponseEntity.status(HttpStatus.OK)
				.body(new Response(studentService.save(student), new Date()));
	}

	@PutMapping
	public ResponseEntity<Response> update(@RequestBody Student student) {
		return ResponseEntity.status(HttpStatus.OK)
				.body(new Response(studentService.save(student), new Date()));
	}

	@DeleteMapping
	public ResponseEntity<Response> delete(@RequestParam("id") int id) {
		studentService.delete(id);
		return ResponseEntity.status(HttpStatus.OK)
				.body(new Response(true, new Date()));
	}
}
1.11 Web MVC Configuration
When we try to consume the API using JavaScript outside the backend project, the web browser raises a warning regarding CORS. So, for handling that we have allowed all origins to connect with our APIs.
package org.websparrow.config;

@Configuration
@EnableWebMvc
public class WebConfiguration implements WebMvcConfigurer {

	@Override
	public void addCorsMappings(CorsRegistry registry) {
		registry.addMapping("/**").allowedOrigins("*").allowedMethods("GET",
				"HEAD", "POST", "PUT", "DELETE", "OPTIONS", "PATCH");
		WebMvcConfigurer.super.addCorsMappings(registry);
	}
}
Finally, the development of REST APIs is completed and ready to consume.
2. Frontend- UI Development
The user interface is the point where a human can interact with the computer (application). Angular 8 is used to create the user interface and will consume the above APIs.
To work on the frontend development, you have to follow the below steps:
1. Download Nodejs form below link according to your OS:
2. After installing Nodejs install Angular CLI: it is a command-line tool for building, scaffolding and install angular-cli on your machine globally:
npm install -g @angular/cli3. Create an Angular project by typing the below command. It will create a skeleton project structure is same as below:
ng new springboot-angular8-ui4. Let’s jump into the newly created Angular project:
cd springboot-angular8-ui2.1 Project Structure
The basic skeleton of the Angular project created by ng new springboot-angular8-ui command in VS Code will look like as follows:
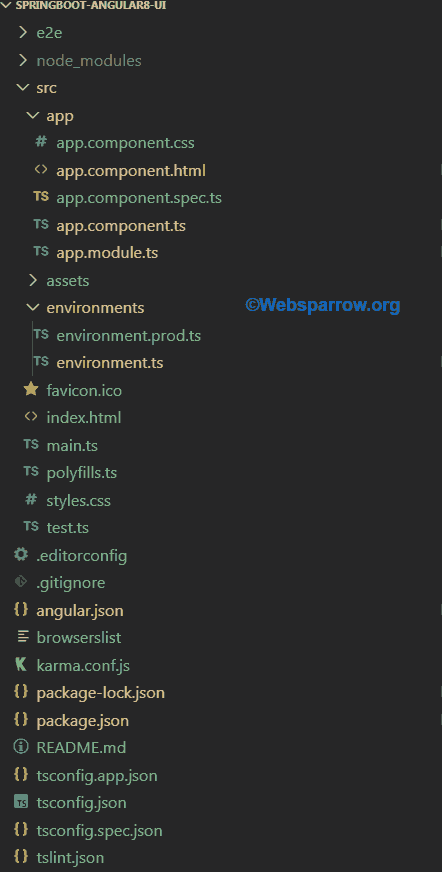
Let’s discuss some main files and directories from the above structure:
2.1.1 package.json
The package.json file is the main building block of the Angular/Node system. It is the manifest file that contains the metadata and dependencies of the project. NPM uses package.json file to manage application, dependency, and packaging. You can create the above file using npm init command, which will be part of our next article.
2.1.2 tsconfig.json
tsconfig.json file guides the compiler to generate JavaScript files. It specifies the root files and the compiler options required to compile the project.
2.1.3 angular.json
This file provides information about the Angular application environment which tells the system to replace which files at the time of building build of a project. It also describes where to put the build of a project and what kind of compilation process will be used ex: aot or jit.
2.1.4 src
This folder contains the root level application project.
2.1.5 node_modules
It provides npm packages for the whole project.
2.1.6 package-lock.json
This file is automatically created when npm modifies node_modules tree or package.json. It describes the dependency tree such that teammates, deployments, and continuous integration are guaranteed to install exactly the same dependencies. So, the user doesn’t need to push node_modules to the repository.
2.2 Interface
Create interface Student which will have the same fields as the database:
ng g i interface/studentexport interface Student {
id: number,
firstName: string,
lastName: string,
email: string
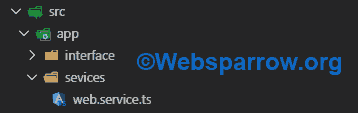
}2.3 Service
Now let’s create a service that will consume rest API. HttpClient is used to communicate with backend services. Use the following command inside the project structure.
ng g s services/webThis command will create an injectable service from which you will consume the REST API.
Import HttpClientModule in app.module.ts. The HttpClient service is included in HttpClientModule so we need to import it first to initiate XSRFrequest.
import { HttpClientModule } from "@angular/common/http";Add HttpClientModule inside imports:
@NgModule({
  declarations: [
    AppComponent
  ],
  imports: [
    BrowserModule,
    FormsModule,
    HttpClientModule,
    AppRoutingModule
  ],
  providers: [],
  bootstrap: [AppComponent]
})
export class AppModule { }
To achieve REST-based communication with backend service. For that, you need to used HttpClient of @angular/common/http package that offers HTTP client API for Angular applications on which XMLHttpRequest exposed by the browser.
import { environment } from "../../environments/environment";
import { Observable } from 'rxjs';
import { Student } from '../interface/student.interface';
import { HttpClient } from "@angular/common/http";
import { Injectable } from "@angular/core";
@Injectable()
export class WebService {

    constructor(private httpClient: HttpClient) { }

    serverUrl: string = "http://localhost:8080/api/"

    get(url: string): Observable<any> {
        return this.httpClient.get(this.serverUrl + url);
    }

    post(url: string, data: Student): Observable<any> {
        return this.httpClient.post(this.serverUrl + url, data);
    }

    put(url: string, data: Student): Observable<any> {
        return this.httpClient.put(this.serverUrl + url, data);
    }

    delete(url: string, data: Student): Observable<any> {
        return this.httpClient.delete(this.serverUrl + url, { params: { id: data.id + "" } });
    }
}
Add service to providers in app.module.ts. You must need to configure an injector with a provider, or it won’t know how to create the dependency.
@NgModule({
declarations: [
AppComponent
],
imports: [
BrowserModule,
HttpClientModule,
AppRoutingModule
],
providers: [WebService],
bootstrap: [AppComponent]
})
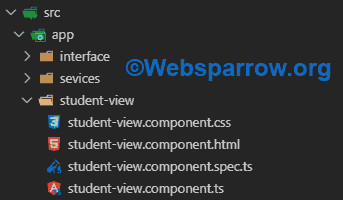
export class AppModule { }2.4 Component
A component is the basic UI building block of the Angular app. It controls the view of the application. Create student-view component which will show a list of students:
ng g c student-viewBy using this command most of your work is done by the Angular CLI, you don’t need to declare your component inside app.module.ts
2.4.1 Design HTML Page
Let’s design the HTML page now. Bootstrap CSS is used for styling in this application, so you need to install below packages:
npm install bootstrap –saveYou can skip this step if you don’t want to include Bootstrap CSS in your application.
Add bootstrap.min.css file in angular.json file inside the styles section.
"styles": [
    "src/styles.css",
    "node_modules/bootstrap/dist/css/bootstrap.min.css"
]<div class="container">
<div class="row">
<h1 style="text-align: center;">Spring Boot + Angular 8 CRUD Example</h1>
</div>
<div class="row">
<form [formGroup]="myForm" (ngSubmit)="submitForm(myForm)">
<div class="form-row align-items-center">
<div class="col-auto">
<label class="sr-only" for="inlineFormInput">First Name</label>
<input type="text" class="form-control mb-2" id="inlineFormInput" placeholder="First name"
formControlName="firstName">
</div>
<div class="col-auto">
<label class="sr-only" for="inlineFormInputGroup">Last Name</label>
<input type="text" class="form-control" id="inlineFormInput" placeholder="Last name"
formControlName="lastName">
</div>
<div class="col-auto">
<label class="sr-only" for="inlineFormInputGroup">Email</label>
<input type="text" class="form-control" id="inlineFormInput" placeholder="Email"
formControlName="email">
</div>
<div class="col-auto">
<button type="submit" class="btn btn-primary mb-2" [disabled]="!myForm.valid">Save</button>
</div>
</div>
</form>
</div>
<div class="row">
<table class="table table-hover">
<thead>
<tr>
<th scope="col">#</th>
<th scope="col">First</th>
<th scope="col">Last</th>
<th scope="col">Email</th>
<th scope="col">Action</th>
</tr>
</thead>
<tbody>
<tr *ngFor="let student of usersList; let i=index">
<th scope="row">{{i+1}}</th>
<td>{{student.firstName}}</td>
<td>{{student.lastName}}</td>
<td>{{student.email}}</td>
<td>
<span style="margin-right: 10px"><button (click)="edit(student)"
class="btn btn-primary mb-2">Edit</button> </span>
<span><button (click)="delete(student)" class="btn btn-primary mb-2">Delete</button></span>
</td>
</tr>
</tbody>
</table>
</div>
</div>Write component to perform actions as we discussed earlier:
import { Component, OnInit } from '@angular/core';
import { Student } from '../interface/student.interface';
import { FormGroup, FormBuilder, FormControl, Validators, Form } from '@angular/forms';
import { WebService } from '../sevices/web.service';

@Component({
  selector: 'app-student-view',
  templateUrl: './student-view.component.html',
  styleUrls: ['./student-view.component.css']
})
export class StudentViewComponent implements OnInit {

  ngOnInit(): void {
    this.createForm();
    this.getData();
  }
  url: string = 'student';
  title = 'Spring Boot + Angular 8 CRUD Example';
  usersList: Array<Student>
  student: Student = undefined
  myForm: FormGroup;

  constructor(private webService: WebService, private formBuilder: FormBuilder) { }


  private createForm() {
    this.myForm = this.formBuilder.group({
      firstName: new FormControl(this.student ? this.student.firstName : '', Validators.required),
      lastName: new FormControl(this.student ? this.student.lastName : '', Validators.required),
      email: new FormControl(this.student ? this.student.email : '', Validators.required)
    });
  }
  private submitForm(data: FormGroup) {
    if (data.valid)
      this.addStudent(data.value)
  }

  getData(): void {
    this.webService.get(this.url).subscribe(res => {
      let response = JSON.parse(JSON.stringify(res))
      this.usersList = response.data
    })
  }

  addStudent(student: Student): void {
    if (this.student)
      student.id = this.student.id
    this.webService.post(this.url, student).subscribe(res => {
      let response = JSON.parse(JSON.stringify(res))
      this.getData()
      this.myForm.reset()
      this.student = undefined
    }, error => {
    })
  }

  edit(student: Student): void {
    this.student = student
    this.myForm.controls['firstName'].setValue(this.student.firstName)
    this.myForm.controls['lastName'].setValue(this.student.lastName)
    this.myForm.controls['email'].setValue(this.student.email)
  }

  delete(student: Student): void {
    this.webService.delete(this.url, student).subscribe(res => {
      let data = JSON.parse(JSON.stringify(res))
      this.getData()
    }, error => {
    })
  }
}
As we are using Forms in our application. So, we need to update our app.module.ts with FormsModule and ReactiveFormsModule.
import { BrowserModule } from '@angular/platform-browser';
import { NgModule } from '@angular/core';
import { FormsModule, ReactiveFormsModule } from "@angular/forms";
import { HttpClientModule } from "@angular/common/http";
import { AppRoutingModule } from './app-routing.module';
import { AppComponent } from './app.component';
import { StudentViewComponent } from './student-view/student-view.component';
import { WebService } from "./sevices/web.service";
@NgModule({
  declarations: [
    AppComponent,
    StudentViewComponent
  ],
  imports: [
    BrowserModule,
    FormsModule,
    ReactiveFormsModule,
    HttpClientModule,
    AppRoutingModule
  ],
  providers: [WebService],
  bootstrap: [AppComponent]
})
export class AppModule { }
Now the final step is to update app.component.html file with your StutentViewComponent’s selector:
<app-student-view></app-student-view>This tag will render your student view component.
3. Test the application
Finally, the development of backend (APIs) and frontend (UI) is completed. To test the application, you need to follow the below steps:
1. Start your backend (APIs) application which you have developed using Spring Boot.
2. Go to your frontend (UI) directory where you have created the Angular project and hit the following command:
npm installIt will install the necessary dependencies/libraries/modules.
3. After installation of modules, start your frontend (UI) application using the command:
npm start4. Now, open your favorite web browser and hit the http://localhost:4200 URL and perform the CRUD operation.
Download Source Code: spring-boot-angular-8-crud-example.zip
References
- Spring Boot RESTful CRUD Example with MySQL Database
- Spring Boot RESTful Web Service with JPA and MySQL
- Spring Boot RESTful Web Service Example
- Angular
- Angular CLI
Similar Posts
- Spring MVC @Controller, @RequestMapping, @RequestParam, and @PathVariable Annotation Example
- Spring c-namespace example
- Spring Security JDBC authentication with Spring Boot
- Spring AOP pointcut example using XML configuration
- Spring Boot – Handling Errors in WebClient
- Versioning of REST API in Spring Boot: Types and Benefits
- Does Spring Boot automatically close database connection?
- Spring @RestController, @GetMapping, @PostMapping, @PutMapping, and @DeleteMapping Annotation Example
- Microservices Configuration Management with Spring Boot
- Spring Boot- Disable Spring banner at startup