Spring 5 MVC Hello World using XML configuration
In the previous tutorial, we have discussed the introduction and features of Spring Web MVC and its project structure. On this page, we are going to show how to create a small Spring MVC application that takes your name as input and greets you.
Well, we can configure your Spring MVC application in many ways but this tutorial is focused on the XML based configuration.
Technology Used
Find the list of all technologies that I have used in this application.
- Eclipse Photon IDE
- JDK 8
- Tomcat 9
- Spring.5.0.2. RELEASE
Dependency Required
To create Spring MVC application, you must need Spring MVC jars in your project build path and Maven is a great tool to do that. Add the following dependency to your pom.xml file.
<project xmlns="http://maven.apache.org/POM/4.0.0" xmlns:xsi="http://www.w3.org/2001/XMLSchema-instance"
	xsi:schemaLocation="http://maven.apache.org/POM/4.0.0 http://maven.apache.org/maven-v4_0_0.xsd">
	<modelVersion>4.0.0</modelVersion>
	<groupId>org.websparrow</groupId>
	<artifactId>spring5-mvc-hello</artifactId>
	<packaging>war</packaging>
	<version>0.0.1-SNAPSHOT</version>
	<dependencies>
		<dependency>
			<groupId>org.springframework</groupId>
			<artifactId>spring-webmvc</artifactId>
			<version>5.0.2.RELEASE</version>
		</dependency>
	</dependencies>
	<build>
		<finalName>spring5-mvc-hello</finalName>
	</build>
</project>
You can it manually by adding JAR’s to project build path.
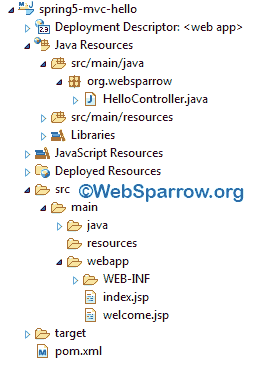
Project Structure
Check the project structure of Spring 5 MVC hello world example using XML configuration in Eclipse IDE.
Configure Front Controller
Add the Spring MVC front controller i.e. DispatcherServlet to your web.xml file.
<!DOCTYPE web-app PUBLIC
 "-//Sun Microsystems, Inc.//DTD Web Application 2.3//EN"
 "http://java.sun.com/dtd/web-app_2_3.dtd" >
<web-app>

	<servlet>
		<servlet-name>dispatcher</servlet-name>
		<servlet-class>org.springframework.web.servlet.DispatcherServlet</servlet-class>
	</servlet>
	<servlet-mapping>
		<servlet-name>dispatcher</servlet-name>
		<url-pattern>*.htm</url-pattern>
	</servlet-mapping>

</web-app>
If you have no idea about URL-pattern click here.
Create Controller
To handle the user input request, create a HelloController class that implements Controller interface which has one method handleRequest(request, response) and its return type is ModelAndView.
package org.websparrow;

import java.util.HashMap;
import java.util.Map;

import javax.servlet.http.HttpServletRequest;
import javax.servlet.http.HttpServletResponse;

import org.springframework.web.servlet.ModelAndView;
import org.springframework.web.servlet.mvc.Controller;

public class HelloController implements Controller {

	@Override
	public ModelAndView handleRequest(HttpServletRequest request, HttpServletResponse response) throws Exception {
		String name = request.getParameter("name");

		Map<String, String> map = new HashMap<>();
		map.put("name", name);

		return new ModelAndView("welcome", map);
	}

}
You have may option to create the controller class that we will learn in the next tutorial.
Map Action Request
To map your form action request o its controller i.e. HelloController, create [serlvlet-name]-servlet.xml. Make sure you have used the same name that you have used the front controller in the web.xml file. In my case, my front controller servlet name is “dispatcher” so my spring configuration file name will be dispatcher-servlet.xml
<?xml version="1.0" encoding="UTF-8"?>
<beans xmlns="http://www.springframework.org/schema/beans" xmlns:xsi="http://www.w3.org/2001/XMLSchema-instance"
	xmlns:p="http://www.springframework.org/schema/p" xmlns:context="http://www.springframework.org/schema/context"
	xmlns:mvc="http://www.springframework.org/schema/mvc"
	xsi:schemaLocation="http://www.springframework.org/schema/beans
                           http://www.springframework.org/schema/beans/spring-beans.xsd
                           http://www.springframework.org/schema/context
                           http://www.springframework.org/schema/context/spring-context.xsd
                           http://www.springframework.org/schema/mvc
                           http://www.springframework.org/schema/mvc/spring-mvc.xsd">

	<bean name="/hello.htm" class="org.websparrow.HelloController" />

	<bean class="org.springframework.web.servlet.view.InternalResourceViewResolver">
		<property name="prefix" value="/" />
		<property name="suffix" value=".jsp" />
	</bean>

</beans>
It’s not compulsory to use dispatcher name, you can choose any name whatever you want.
View Components
Create the JSP pages that visible on the user machine.
index.jsp: This page will take the username and sends a request to the controller.
<html>
<body>

	<h2>Spring 5 MVC Hello World Example using XML configuration</h2>

	<form action="hello.htm" method="post">

		Name: <input name="name" type="text" />
		      <input value="Submit" type="submit" />

	</form>

</body>
</html>
welcome.jsp: This page will greet the user.
<%@ page language="java" contentType="text/html; charset=ISO-8859-1"
pageEncoding="ISO-8859-1" isELIgnored="false"%>
<!DOCTYPE html>
<html>
<body>
<h2>Hello ${name}</h2>
<p>Welcome to Spring MVC world.</p>
</body>
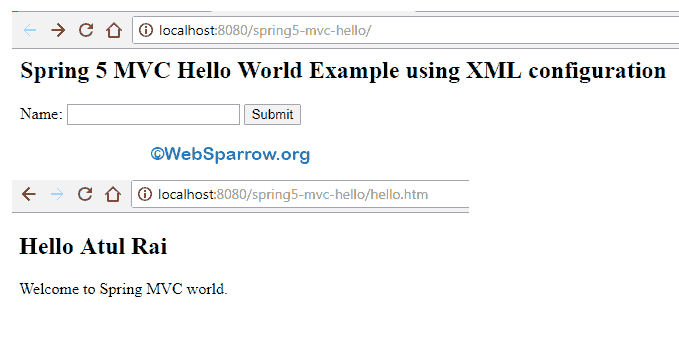
</html>Output
Finally, everything was completed. Run your project and will get the following result.
References
Download Source Code: spring-5-mvc-hello-world-using-xml-configuration.zip